I have seen request and many questions like “How to setup a single node cluster or multi-node cluster from scratch ?” So I thought lets put one post on this as well apart from day to day issues or work.
This article is to configure HDP stack but same can help you to setup for other distribution like CDH or MapR.
First we should have and VM to work with and one OS. I’m using VirtualBox but VMware would work as well in the same way.
Step 1 : You can download VirtualBox from https://www.virtualbox.org/wiki/Downloads and it is free open source virtualization software that allows you to easily create virtual machines.Once you have installed VBox and up and running then we need to download any 64 bit OS like centos from http://mirror.centos.org/centos/6/isos/x86_64/.
Step 2: Create a virtual machine according to your resource configuration.
- Open it up and click on the New icon on the top left of the toolbar:

- Name your VM as per your convenience, but make sure you choose
Linuxas the type andRedHat(64-bit)as the version.
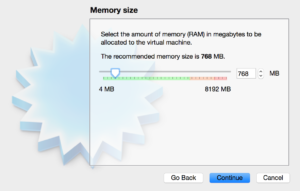
- Next, choose the amount of memory you’d like to reserve for this VM. I would you to chose 4 GB and default would be 756 MB.
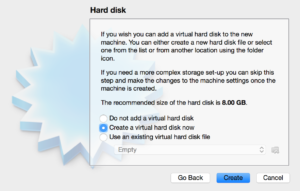
- Next, you have to add a virtual hard disk with select Create a virtual hard disk now :
- Now you need to select whichever type of VM hard disk type you’d like.

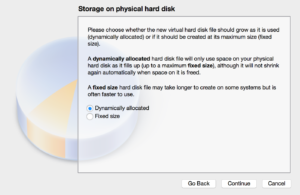
- The next window will ask you if you’d like dynamic storage or fixed storage. Select dynamic. Dynamic storage means that VirtualBox will only use the amount of space, on your real hard drive, that the VM actually needs until it reaches the maximum we allot. This will also allow us to add more to the VM later if we need it.
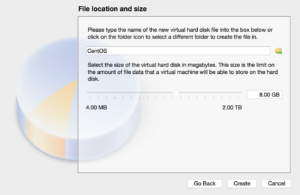
- The next prompt is to allot the amount of hard disk space for the VM so here you can select 30 GB or more as per your requirement.
- Now you have almost setup your virtual machine and it’s time to install centos with VM. Your VirtualBox window should now contain a VM that is powered off.
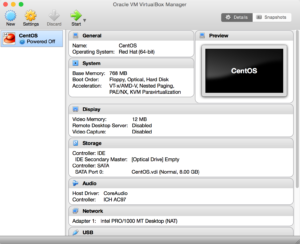
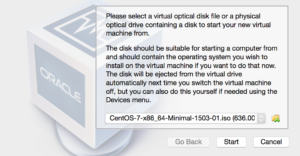
- Double click on it to start it up. You’ll be prompted to point the manager to the iso we downloaded earlier. Locate the file and click start.
- Before you start installing centos you need to change your networkAdapter settings, actually you need to one more adapter2 to network “Host only Adapter”

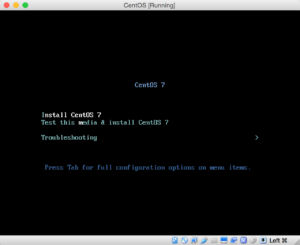
- VirtualBox will start the iso and you will be prompted to select an install mode. You can select but it defaults to Test this media & install CentOS 7.
- Next, The install process will begin by asking you to select your language of preference. Once you’ve done that the next prompt will be to select the install destination.
- Click on the Install Destination label and then immediately click Done at the top of the next window.and now you can click on begin Install.
- Now, the install will begin, but there are still two more steps we need to take. The next window will give us the opportunity to set the root password or to add an additional account.
- Select root password and click on Finish configuration.
- The installer will complete a few more things and then you’ll see a message at the bottom that says Complete and will find a button to reboot the VM. Go ahead and click Reboot to startup the VM for the first time.Once the VM reboots you’ll be able to log in.
Now, after installing centos as a virtual machine you have to prepare your environment for ambari or HDP installation.
- First you need to check your network adapter and change as per following settings. If you do not have ifcfg-eth1 then you can copy eth0 file to the same location and then change it accordingly.
[root@hadoopdemo ~]# ls -ltrh /etc/sysconfig/network-scripts/ifcfg-eth*
-rw-r--r--. 1 root root 231 Aug 26 23:16 /etc/sysconfig/network-scripts/ifcfg-eth0
-rw-r--r--. 1 root root 273 Aug 26 23:17 /etc/sysconfig/network-scripts/ifcfg-eth1
[root@hadoopdemo ~]# cat /etc/sysconfig/network-scripts/ifcfg-eth0
DEVICE=eth0
HWADDR=08:00:27:84:B1:0F
TYPE=Ethernet
UUID=dc7fab04-63fc-436d-b0b9-c6211763b60e
ONBOOT=yes
NM_CONTROLLED=yes
BOOTPROTO=dhcp
DEFROUTE=yes
PEERDNS=yes
PEERROUTES=yes
IPV4_FAILURE_FATAL=yes
IPV6INIT=no
NAME="System eth0"
[root@hadoopdemo ~]# cat /etc/sysconfig/network-scripts/ifcfg-eth1
DEVICE=eth1
HWADDR=08:00:27:64:9A:09
TYPE=Ethernet
UUID=fed79acc-a5d6-48b5-8774-5b8d14ebe8b1
ONBOOT=yes
NM_CONTROLLED=no
BOOTPROTO=none
DEFROUTE=yes
PEERDNS=yes
PEERROUTES=yes
IPV4_FAILURE_FATAL=yes
IPV6INIT=no
NAME="System eth1"
IPADDR=192.168.56.44
NETMASK=255.255.255.0
[root@hadoopdemo ~]#
- Disable the firewall or Configuring iptables:
For Ambari to communicate during setup with the hosts it deploys to and manages, certain ports must be open and available. The easiest way to do this is to temporarily disable iptables, as follows:
[root@sandbox ~]# chkconfig iptables off
[root@sandbox ~]# chkconfig ip6tables off
[root@sandbox ~]# service iptables status
iptables: Firewall is not running.
- Configure ntpd to start at bootup:
The clocks of all the nodes in your cluster and the machine that runs the browser through which you access the Ambari Web interface must be able to synchronize with each other.To install the NTP service and ensure it’s ensure it’s started on boot, run the following commands on each host:
[root@sandbox ~]# yum install ntp
Loaded plugins: fastestmirror, refresh-packagekit, security
Setting up Install Process
Loading mirror speeds from cached hostfile
* base: centos.excellmedia.net
* extras: centos.excellmedia.net
* updates: centos-hn.viettelidc.com.vn
Package ntp-4.2.6p5-10.el6.centos.2.x86_64 already installed and latest version
Nothing to do
[root@sandbox ~]# service ntpd status
ntpd is stopped
[root@sandbox ~]# service ntpd start
Starting ntpd: [ OK ]

chkconfig ntpd on
- Check DNS and NSCD :
All hosts in your system must be configured for both forward and and reverse DNS.Using a text editor, open the hosts file on every host in your cluster and add a line for each host in your cluster. The line should consist of the IP address and the FQDN.
vi /etc/hosts
192.168.56.43 sandbox (fully.qualified.domain.name)
Note :Do not remove the following two lines from your host file, or various programs that require network functionality may fail.
127.0.0.1 localhost.localdomain localhost
::1 localhost6.localdomain6 localhost6
[root@sandbox ~]# cat /etc/hosts
127.0.0.1 localhost localhost.localdomain localhost4 localhost4.localdomain4
::1 localhost localhost.localdomain localhost6 localhost6.localdomain6
192.168.56.43 sandbox
192.168.56.53 w3.hdp22
- Edit the Network Configuration File: Using a text editor, open the network configuration file on every host and set the desired network configuration for each host. For example:
vi /etc/sysconfig/network
Modify the HOSTNAME property to set the fully qualified domain name.
NETWORKING=yes
HOSTNAME=<fully.qualified.domain.name>
[root@sandbox ~]# cat /etc/sysconfig/network
NETWORKING=yes
HOSTNAME=sandbox
- Start the ssh-Service and make sure that sshd ist started automatically on startup:
[root@sandbox ~]# /etc/init.d/sshd status
openssh-daemon is stopped
[root@sandbox ~]# chkconfig sshd
[root@sandbox ~]# chkconfig sshd on
[root@sandbox ~]# /etc/init.d/sshd start
Starting sshd: [ OK ]
[root@sandbox ~]# /etc/init.d/sshd status
openssh-daemon (pid 2685) is running...
- Disable SELinux and PackageKit and check the umask Value:
vi /etc/selinux/config
Change SELINUX=enforcing to SELINUX=disabled.
[root@sandbox ~]# cat /etc/selinux/config

# This file controls the state of SELinux on the system.
# SELINUX= can take one of these three values:
# enforcing - SELinux security policy is enforced.
# permissive - SELinux prints warnings instead of enforcing.
# disabled - No SELinux policy is loaded.
#SELINUX=enforcing
SELINUX=disabled
# SELINUXTYPE= can take one of these two values:
# targeted - Targeted processes are protected,
# mls - Multi Level Security protection.
SELINUXTYPE=targeted


[root@sandbox ~]#
- To disable on the RHEL/CentOS installation host, open /etc/yum/pluginconf.d/refresh-packagekit.conf with a text editor and make this change:
- enabled=0
- Check Umask value and change it accordingly because Ambari, HDP, and HDF support umask values of 022 (0022 is functionally equivalent), 027 (0027 is functionally equivalent). These values must be set on all hosts:
</pre>
<pre>echo umask 0022 >> /etc/profile
[root@sandbox ~]# umask
0022
- Prepare password-less SSH Login for the root user to localhost:
[root@sandbox ~]# ssh-keygen -t dsa -P '' -f ~/.ssh/id_dsa
Generating public/private dsa key pair.
Your identification has been saved in /root/.ssh/id_dsa.
Your public key has been saved in /root/.ssh/id_dsa.pub.
The key fingerprint is:
f1:80:6f:c0:58:a8:c8:e8:f5:60:b5:da:d2:94:a1:9b root@sandbox
The key's randomart image is:
+--[ DSA 1024]----+
| .. |
| .* . |
|o. .+ B o |
|o..= + o + |
|. o X S . |
| . E + . |
| . |
| |
| |
+-----------------+
[root@sandbox ~]# cat ~/.ssh/id_dsa.pub > ~/.ssh/authorized_keys
[root@sandbox ~]# chmod 600 ~/.ssh/authorized_keys
[root@sandbox ~]# ssh `hostname`
The authenticity of host 'sandbox (192.168.56.43)' can't be established.
RSA key fingerprint is 06:f2:3a:10:8a:34:94:94:4e:97:fd:b6:01:91:1d:8f.
Are you sure you want to continue connecting (yes/no)? yes
Warning: Permanently added 'sandbox,192.168.56.43' (RSA) to the list of known hosts.
Last login: Fri Aug 18 02:36:46 2017 from 192.168.56.1
[root@sandbox ~]# exit
logout
Connection to sandbox closed.
- Now download required ambari repo and check for available ambari version:
[root@sandbox ~]# wget -nv http://public-repo-1.hortonworks.com/ambari/centos6/2.x/updates/2.5.1.0/ambari.repo -O /etc/yum.repos.d/ambari.repo
2017-08-18 02:42:30 URL:http://public-repo-1.hortonworks.com/ambari/centos6/2.x/updates/2.5.1.0/ambari.repo  "/etc/yum.repos.d/ambari.repo" [1]
[root@sandbox ~]# ll /etc/yum.repos.d/ambari.repo
-rw-r--r-- 1 root root 306 May 31 18:07 /etc/yum.repos.d/ambari.repo
[root@sandbox ~]# yum repolist
Loaded plugins: fastestmirror, refresh-packagekit, security
Loading mirror speeds from cached hostfile
* base: centos.excellmedia.net
* extras: centos.excellmedia.net
* updates: centos-hn.viettelidc.com.vn
ambari-2.5.1.0 | 2.9 kB 00:00
ambari-2.5.1.0/primary_db | 8.6 kB 00:00
repo id repo name status
ambari-2.5.1.0 ambari Version - ambari-2.5.1.0 12
base CentOS-6 - Base 6,706
extras CentOS-6 - Extras 45
updates CentOS-6 - Updates 472
repolist: 7,235
- Next, Install ambari server and ambari agent:
[root@sandbox ~]# yum install ambari-server
Loaded plugins: fastestmirror, refresh-packagekit, security
Setting up Install Process
Loading mirror speeds from cached hostfile
* base: centos.excellmedia.net
* extras: centos.excellmedia.net
* updates: centos-hn.viettelidc.com.vn
Resolving Dependencies
Running transaction check
Package ambari-server.x86_64 0:2.5.1.0-159 will be installed
Processing Dependency: postgresql-server = 8.1 for package: ambari-server-2.5.1.0-159.x86_64
Running transaction check
Package postgresql-server.x86_64 0:8.4.20-7.el6 will be installed
Processing Dependency: postgresql-libs(x86-64) = 8.4.20-7.el6 for package: postgresql-server-8.4.20-7.el6.x86_64
Processing Dependency: postgresql(x86-64) = 8.4.20-7.el6 for package: postgresql-server-8.4.20-7.el6.x86_64
Processing Dependency: libpq.so.5()(64bit) for package: postgresql-server-8.4.20-7.el6.x86_64
Running transaction check
Package postgresql.x86_64 0:8.4.20-7.el6 will be installed
Package postgresql-libs.x86_64 0:8.4.20-7.el6 will be installed
Finished Dependency ResolutionDependencies Resolved======================================================================================================================================================
Package Arch Version Repository Size
======================================================================================================================================================
Installing:
ambari-server x86_64 2.5.1.0-159 ambari-2.5.1.0 664 M
Installing for dependencies:
postgresql x86_64 8.4.20-7.el6 base 2.6 M
postgresql-libs x86_64 8.4.20-7.el6 base 202 k
postgresql-server x86_64 8.4.20-7.el6 base 3.4 M

Transaction Summary
======================================================================================================================================================
Install 4 Package(s)

Total size: 670 M
Installed size: 751 M
Is this ok [y/N]: y
Downloading Packages:
warning: rpmts_HdrFromFdno: Header V3 RSA/SHA1 Signature, key ID c105b9de: NOKEY
Retrieving key from file:///etc/pki/rpm-gpg/RPM-GPG-KEY-CentOS-6
Importing GPG key 0xC105B9DE:
Userid : CentOS-6 Key (CentOS 6 Official Signing Key)centos-6-key@centos.org
Package: centos-release-6-9.el6.12.3.x86_64 (@anaconda-CentOS-201703281317.x86_64/6.9)
From : /etc/pki/rpm-gpg/RPM-GPG-KEY-CentOS-6
Is this ok [y/N]: y
Running rpm_check_debug
Running Transaction Test
Transaction Test Succeeded
Running Transaction
Installing : postgresql-libs-8.4.20-7.el6.x86_64 1/4
Installing : postgresql-8.4.20-7.el6.x86_64 2/4
Installing : postgresql-server-8.4.20-7.el6.x86_64 3/4
Installing : ambari-server-2.5.1.0-159.x86_64 4/4
Verifying : ambari-server-2.5.1.0-159.x86_64 1/4
Verifying : postgresql-8.4.20-7.el6.x86_64 2/4
Verifying : postgresql-server-8.4.20-7.el6.x86_64 3/4
Verifying : postgresql-libs-8.4.20-7.el6.x86_64 4/4

Installed:
ambari-server.x86_64 0:2.5.1.0-159

Dependency Installed:
postgresql.x86_64 0:8.4.20-7.el6 postgresql-libs.x86_64 0:8.4.20-7.el6 postgresql-server.x86_64 0:8.4.20-7.el6

Complete!
[root@sandbox ~]# yum install ambari-agent
Loaded plugins: fastestmirror, refresh-packagekit, security
Setting up Install Process
Loading mirror speeds from cached hostfile
* base: centos.excellmedia.net
* extras: centos.excellmedia.net
* updates: centos-hn.viettelidc.com.vn
Resolving Dependencies
Running transaction check
Package ambari-agent.x86_64 0:2.5.1.0-159 will be installed
Finished Dependency Resolution

Dependencies Resolved

======================================================================================================================================================
Package Arch Version Repository Size
======================================================================================================================================================
Installing:
ambari-agent x86_64 2.5.1.0-159 ambari-2.5.1.0 39 M

Transaction Summary
======================================================================================================================================================
Install 1 Package(s)

Total download size: 39 M
Installed size: 59 M
Is this ok [y/N]: y
Downloading Packages:
ambari-agent-2.5.1.0-159.x86_64.rpm | 39 MB 01:27
Running rpm_check_debug
Running Transaction Test
Transaction Test Succeeded
Running Transaction
Installing : ambari-agent-2.5.1.0-159.x86_64 1/1
Verifying : ambari-agent-2.5.1.0-159.x86_64 1/1

Installed:
ambari-agent.x86_64 0:2.5.1.0-159

Complete!
- Next, if you want to setup ambari with mysql or some other rdbms except postgres then you can install that db like I did mysql:
[root@sandbox ~]# yum install mysql-server mysql-connector-java
Loaded plugins: fastestmirror, refresh-packagekit, security
Setting up Install Process
Loading mirror speeds from cached hostfile
* base: centos.excellmedia.net
* extras: centos.excellmedia.net
* updates: centos-hn.viettelidc.com.vn
Resolving Dependencies
Running transaction check
Package mysql-connector-java.noarch 1:5.1.17-6.el6 will be installed
Processing Dependency: jta  1.0 for package: 1:mysql-connector-java-5.1.17-6.el6.noarch
Processing Dependency: slf4j for package: 1:mysql-connector-java-5.1.17-6.el6.noarch
Package mysql-server.x86_64 0:5.1.73-8.el6_8 will be installed
Processing Dependency: mysql = 5.1.73-8.el6_8 for package: mysql-server-5.1.73-8.el6_8.x86_64
Processing Dependency: perl-DBI for package: mysql-server-5.1.73-8.el6_8.x86_64
Processing Dependency: perl-DBD-MySQL for package: mysql-server-5.1.73-8.el6_8.x86_64
Processing Dependency: perl(DBI) for package: mysql-server-5.1.73-8.el6_8.x86_64
Running transaction check
Package geronimo-specs-compat.noarch 0:1.0-3.5.M2.el6 will be installed
Processing Dependency: geronimo-specs = 1.0-3.5.M2.el6 for package: geronimo-specs-compat-1.0-3.5.M2.el6.noarch
Package mysql.x86_64 0:5.1.73-8.el6_8 will be installed
Package perl-DBD-MySQL.x86_64 0:4.013-3.el6 will be installed
Package perl-DBI.x86_64 0:1.609-4.el6 will be installed
Package slf4j.noarch 0:1.5.8-8.el6 will be installed
Running transaction check
Package geronimo-specs.noarch 0:1.0-3.5.M2.el6 will be installed
Processing Dependency: mx4j = 2.0.1 for package: geronimo-specs-1.0-3.5.M2.el6.noarch
Processing Dependency: apache-tomcat-apis for package: geronimo-specs-1.0-3.5.M2.el6.noarch
Running transaction check
Package apache-tomcat-apis.noarch 0:0.1-1.el6 will be installed
Package mx4j.noarch 1:3.0.1-9.13.el6 will be installed
Processing Dependency: jaf for package: 1:mx4j-3.0.1-9.13.el6.noarch
Running transaction check
Package axis.noarch 0:1.2.1-7.5.el6_5 will be installed
Processing Dependency: wsdl4j for package: axis-1.2.1-7.5.el6_5.noarch
Processing Dependency: jaxp_parser_impl for package: axis-1.2.1-7.5.el6_5.noarch
Processing Dependency: jakarta-commons-discovery for package: axis-1.2.1-7.5.el6_5.noarch
Package bcel.x86_64 0:5.2-7.2.el6 will be installed
Processing Dependency: regexp for package: bcel-5.2-7.2.el6.x86_64
Processing Dependency: libgcj_bc.so.1()(64bit) for package: bcel-5.2-7.2.el6.x86_64
Package classpathx-jaf.x86_64 0:1.0-15.4.el6 will be installed
Package classpathx-mail.noarch 0:1.1.1-9.4.el6 will be installed
Package jakarta-commons-logging.noarch 0:1.0.4-10.el6 will be installed
Package log4j.x86_64 0:1.2.14-6.4.el6 will be installed
Package xml-commons-apis.x86_64 0:1.3.04-3.6.el6 will be installed
Package xml-commons-resolver.x86_64 0:1.1-4.18.el6 will be installed
Running transaction check
Package jakarta-commons-discovery.noarch 1:0.4-5.4.el6 will be installed
Package jakarta-commons-httpclient.x86_64 1:3.1-0.9.el6_5 will be installed
Package java-1.5.0-gcj.x86_64 0:1.5.0.0-29.1.el6 will be installed
ambari-2.5.1.0/filelists_db | 147 kB 00:01
base/filelists_db | 6.4 MB 00:11
extras/filelists_db | 25 kB 00:00
http://centos-hn.viettelidc.com.vn/6.9/updates/x86_64/repodata/b2783bd71ec8cd148a2c5dacd31f4326cfbc0de737f400c3f0d3e90fc281a6a6-filelists.sqlite.bz2: [Errno 14] PYCURL ERROR 22 - "The requested URL returned error: 403 Forbidden"
Trying other mirror.
To address this issue please refer to the below knowledge base article

https://access.redhat.com/solutions/69319

If above article doesn't help to resolve this issue please open a ticket with Red Hat Support.

updates/filelists_db | 1.6 MB 00:02
Processing Dependency: sinjdoc for package: java-1.5.0-gcj-1.5.0.0-29.1.el6.x86_64
Package libgcj.x86_64 0:4.4.7-18.el6 will be installed
Package regexp.x86_64 0:1.5-4.4.el6 will be installed
Package wsdl4j.noarch 0:1.5.2-7.8.el6 will be installed
Running transaction check
Package sinjdoc.x86_64 0:0.5-9.1.el6 will be installed
Processing Dependency: java_cup 0.10 for package: sinjdoc-0.5-9.1.el6.x86_64
Running transaction check
Package java_cup.x86_64 1:0.10k-5.el6 will be installed
Finished Dependency Resolution

Dependencies Resolved

======================================================================================================================================================
Package Arch Version Repository Size
======================================================================================================================================================
Installing:
mysql-connector-java noarch 1:5.1.17-6.el6 base 1.4 M
mysql-server x86_64 5.1.73-8.el6_8 base 8.6 M
Installing for dependencies:
apache-tomcat-apis noarch 0.1-1.el6 base 164 k
axis noarch 1.2.1-7.5.el6_5 base 1.5 M
bcel x86_64 5.2-7.2.el6 base 1.4 M
classpathx-jaf x86_64 1.0-15.4.el6 base 100 k
classpathx-mail noarch 1.1.1-9.4.el6 base 479 k
geronimo-specs noarch 1.0-3.5.M2.el6 base 111 k
geronimo-specs-compat noarch 1.0-3.5.M2.el6 base 7.1 k
jakarta-commons-discovery noarch 1:0.4-5.4.el6 base 73 k
jakarta-commons-httpclient x86_64 1:3.1-0.9.el6_5 base 593 k
jakarta-commons-logging noarch 1.0.4-10.el6 base 52 k
java-1.5.0-gcj x86_64 1.5.0.0-29.1.el6 base 139 k
java_cup x86_64 1:0.10k-5.el6 base 197 k
libgcj x86_64 4.4.7-18.el6 base 18 M
log4j x86_64 1.2.14-6.4.el6 base 679 k
mx4j noarch 1:3.0.1-9.13.el6 base 1.1 M
mysql x86_64 5.1.73-8.el6_8 base 895 k
perl-DBD-MySQL x86_64 4.013-3.el6 base 134 k
perl-DBI x86_64 1.609-4.el6 base 705 k
regexp x86_64 1.5-4.4.el6 base 105 k
sinjdoc x86_64 0.5-9.1.el6 base 705 k
slf4j noarch 1.5.8-8.el6 base 131 k
wsdl4j noarch 1.5.2-7.8.el6 base 157 k
xml-commons-apis x86_64 1.3.04-3.6.el6 base 439 k
xml-commons-resolver x86_64 1.1-4.18.el6 base 145 k

Transaction Summary
======================================================================================================================================================
Install 26 Package(s)

Total download size: 38 M
Installed size: 124 M
Is this ok [y/N]: y
Downloading Packages:
(1/26): apache-tomcat-apis-0.1-1.el6.noarch.rpm | 164 kB 00:00
(2/26): axis-1.2.1-7.5.el6_5.noarch.rpm | 1.5 MB 00:01
(3/26): bcel-5.2-7.2.el6.x86_64.rpm | 1.4 MB 00:02
(4/26): classpathx-jaf-1.0-15.4.el6.x86_64.rpm | 100 kB 00:00
(5/26): classpathx-mail-1.1.1-9.4.el6.noarch.rpm | 479 kB 00:00
(6/26): geronimo-specs-1.0-3.5.M2.el6.noarch.rpm | 111 kB 00:00
(7/26): geronimo-specs-compat-1.0-3.5.M2.el6.noarch.rpm | 7.1 kB 00:00
(8/26): jakarta-commons-discovery-0.4-5.4.el6.noarch.rpm | 73 kB 00:00
(9/26): jakarta-commons-httpclient-3.1-0.9.el6_5.x86_64.rpm | 593 kB 00:01
(10/26): jakarta-commons-logging-1.0.4-10.el6.noarch.rpm | 52 kB 00:00
(11/26): java-1.5.0-gcj-1.5.0.0-29.1.el6.x86_64.rpm | 139 kB 00:00
(12/26): java_cup-0.10k-5.el6.x86_64.rpm | 197 kB 00:00
(13/26): libgcj-4.4.7-18.el6.x86_64.rpm | 18 MB 00:15
(14/26): log4j-1.2.14-6.4.el6.x86_64.rpm | 679 kB 00:00
(15/26): mx4j-3.0.1-9.13.el6.noarch.rpm | 1.1 MB 00:00
(16/26): mysql-5.1.73-8.el6_8.x86_64.rpm | 895 kB 00:00
(17/26): mysql-connector-java-5.1.17-6.el6.noarch.rpm | 1.4 MB 00:00
(18/26): mysql-server-5.1.73-8.el6_8.x86_64.rpm | 8.6 MB 00:04
(19/26): perl-DBD-MySQL-4.013-3.el6.x86_64.rpm | 134 kB 00:00
(20/26): perl-DBI-1.609-4.el6.x86_64.rpm | 705 kB 00:00
(21/26): regexp-1.5-4.4.el6.x86_64.rpm | 105 kB 00:00
(22/26): sinjdoc-0.5-9.1.el6.x86_64.rpm | 705 kB 00:01
(23/26): slf4j-1.5.8-8.el6.noarch.rpm | 131 kB 00:00
(24/26): wsdl4j-1.5.2-7.8.el6.noarch.rpm | 157 kB 00:00
(25/26): xml-commons-apis-1.3.04-3.6.el6.x86_64.rpm | 439 kB 00:00
(26/26): xml-commons-resolver-1.1-4.18.el6.x86_64.rpm | 145 kB 00:00
------------------------------------------------------------------------------------------------------------------------------------------------------
Total 983 kB/s | 38 MB 00:40
Running rpm_check_debug
Running Transaction Test
Transaction Test Succeeded
Running Transaction
Installing : libgcj-4.4.7-18.el6.x86_64 1/26
Installing : jakarta-commons-logging-1.0.4-10.el6.noarch 2/26
Installing : perl-DBI-1.609-4.el6.x86_64 3/26
Installing : perl-DBD-MySQL-4.013-3.el6.x86_64 4/26
Installing : 1:jakarta-commons-discovery-0.4-5.4.el6.noarch 5/26
Installing : java-1.5.0-gcj-1.5.0.0-29.1.el6.x86_64 6/26
Installing : 1:java_cup-0.10k-5.el6.x86_64 7/26
Installing : sinjdoc-0.5-9.1.el6.x86_64 8/26
Installing : classpathx-jaf-1.0-15.4.el6.x86_64 9/26
Installing : xml-commons-apis-1.3.04-3.6.el6.x86_64 10/26
Installing : log4j-1.2.14-6.4.el6.x86_64 11/26
Installing : classpathx-mail-1.1.1-9.4.el6.noarch 12/26
Installing : xml-commons-resolver-1.1-4.18.el6.x86_64 13/26
Installing : 1:jakarta-commons-httpclient-3.1-0.9.el6_5.x86_64 14/26
Installing : regexp-1.5-4.4.el6.x86_64 15/26
Installing : bcel-5.2-7.2.el6.x86_64 16/26
Installing : wsdl4j-1.5.2-7.8.el6.noarch 17/26
Installing : axis-1.2.1-7.5.el6_5.noarch 18/26
Installing : 1:mx4j-3.0.1-9.13.el6.noarch 19/26
Installing : slf4j-1.5.8-8.el6.noarch 20/26
Installing : apache-tomcat-apis-0.1-1.el6.noarch 21/26
Installing : geronimo-specs-1.0-3.5.M2.el6.noarch 22/26
Installing : geronimo-specs-compat-1.0-3.5.M2.el6.noarch 23/26
Installing : mysql-5.1.73-8.el6_8.x86_64 24/26
Installing : mysql-server-5.1.73-8.el6_8.x86_64 25/26
Installing : 1:mysql-connector-java-5.1.17-6.el6.noarch 26/26
Verifying : geronimo-specs-1.0-3.5.M2.el6.noarch 1/26
Verifying : axis-1.2.1-7.5.el6_5.noarch 2/26
Verifying : classpathx-mail-1.1.1-9.4.el6.noarch 3/26
Verifying : perl-DBD-MySQL-4.013-3.el6.x86_64 4/26
Verifying : 1:jakarta-commons-discovery-0.4-5.4.el6.noarch 5/26
Verifying : perl-DBI-1.609-4.el6.x86_64 6/26
Verifying : 1:java_cup-0.10k-5.el6.x86_64 7/26
Verifying : sinjdoc-0.5-9.1.el6.x86_64 8/26
Verifying : bcel-5.2-7.2.el6.x86_64 9/26
Verifying : 1:jakarta-commons-httpclient-3.1-0.9.el6_5.x86_64 10/26
Verifying : regexp-1.5-4.4.el6.x86_64 11/26
Verifying : jakarta-commons-logging-1.0.4-10.el6.noarch 12/26
Verifying : wsdl4j-1.5.2-7.8.el6.noarch 13/26
Verifying : log4j-1.2.14-6.4.el6.x86_64 14/26
Verifying : 1:mx4j-3.0.1-9.13.el6.noarch 15/26
Verifying : classpathx-jaf-1.0-15.4.el6.x86_64 16/26
Verifying : java-1.5.0-gcj-1.5.0.0-29.1.el6.x86_64 17/26
Verifying : slf4j-1.5.8-8.el6.noarch 18/26
Verifying : libgcj-4.4.7-18.el6.x86_64 19/26
Verifying : mysql-5.1.73-8.el6_8.x86_64 20/26
Verifying : xml-commons-apis-1.3.04-3.6.el6.x86_64 21/26
Verifying : geronimo-specs-compat-1.0-3.5.M2.el6.noarch 22/26
Verifying : 1:mysql-connector-java-5.1.17-6.el6.noarch 23/26
Verifying : mysql-server-5.1.73-8.el6_8.x86_64 24/26
Verifying : xml-commons-resolver-1.1-4.18.el6.x86_64 25/26
Verifying : apache-tomcat-apis-0.1-1.el6.noarch 26/26

Installed:
mysql-connector-java.noarch 1:5.1.17-6.el6 mysql-server.x86_64 0:5.1.73-8.el6_8

Dependency Installed:
apache-tomcat-apis.noarch 0:0.1-1.el6 axis.noarch 0:1.2.1-7.5.el6_5 bcel.x86_64 0:5.2-7.2.el6
classpathx-jaf.x86_64 0:1.0-15.4.el6 classpathx-mail.noarch 0:1.1.1-9.4.el6 geronimo-specs.noarch 0:1.0-3.5.M2.el6
geronimo-specs-compat.noarch 0:1.0-3.5.M2.el6 jakarta-commons-discovery.noarch 1:0.4-5.4.el6 jakarta-commons-httpclient.x86_64 1:3.1-0.9.el6_5
jakarta-commons-logging.noarch 0:1.0.4-10.el6 java-1.5.0-gcj.x86_64 0:1.5.0.0-29.1.el6 java_cup.x86_64 1:0.10k-5.el6
libgcj.x86_64 0:4.4.7-18.el6 log4j.x86_64 0:1.2.14-6.4.el6 mx4j.noarch 1:3.0.1-9.13.el6
mysql.x86_64 0:5.1.73-8.el6_8 perl-DBD-MySQL.x86_64 0:4.013-3.el6 perl-DBI.x86_64 0:1.609-4.el6
regexp.x86_64 0:1.5-4.4.el6 sinjdoc.x86_64 0:0.5-9.1.el6 slf4j.noarch 0:1.5.8-8.el6
wsdl4j.noarch 0:1.5.2-7.8.el6 xml-commons-apis.x86_64 0:1.3.04-3.6.el6 xml-commons-resolver.x86_64 0:1.1-4.18.el6

Complete!
- Check whether mysql driver is installed correctly or not. Also start mysql instance on server:
[root@sandbox ~]# ls /usr/share/java/mysql-connector-java.jar
/usr/share/java/mysql-connector-java.jar

[root@sandbox ~]# /etc/init.d/mysqld status
mysqld is stopped
[root@sandbox ~]# /etc/init.d/mysqld start
Initializing MySQL database: Installing MySQL system tables...
OK

[ OK ]
Starting mysqld:
- Now You need to setup password for root and create a user ‘ambari’ for ambari installation:
[root@sandbox ~]# mysql
Welcome to the MySQL monitor. Commands end with ; or \g.
Your MySQL connection id is 2
Server version: 5.1.73 Source distribution
Copyright (c) 2000, 2013, Oracle and/or its affiliates. All rights reserved.
Oracle is a registered trademark of Oracle Corporation and/or its
affiliates. Other names may be trademarks of their respective
owners.
Type 'help;' or '\h' for help. Type '\c' to clear the current input statement.
mysql&amp;amp;amp;amp;amp;gt; show databases;
+--------------------+
| Database |
+--------------------+
| information_schema |
| mysql |
| test |
+--------------------+
3 rows in set (0.00 sec)
mysql&amp;amp;amp;amp;amp;gt;use mysql;
Reading table information for completion of table and column names
You can turn off this feature to get a quicker startup with -A
Database changed
mysql>update user set password=PASSWORD("hadoop") where User='root';
Query OK, 3 rows affected (0.00 sec)
Rows matched: 3 Changed: 3 Warnings: 0
mysql>flush privileges;
Query OK, 0 rows affected (0.00 sec)
mysql>select user,host from mysql.user;
+--------+-----------+
| user | host |
+--------+-----------+
| root | 127.0.0.1 |
| | localhost |
| root | localhost |
| | sandbox |
| root | sandbox |
+--------+-----------+
mysql>GRANT ALL PRIVILEGES ON *.* TO 'ambari'@'localhost';
Query OK, 0 rows affected (0.00 sec)
mysql>CREATE USER 'ambari'@'sandbox' IDENTIFIED BY 'hadoop';
Query OK, 0 rows affected (0.00 sec)
mysql>GRANT ALL PRIVILEGES ON *.* TO 'ambari'@'sandbox';
Query OK, 0 rows affected (0.00 sec)
mysql>FLUSH PRIVILEGES;
Query OK, 0 rows affected (0.00 sec)
mysql>select user,host from mysql.user;
+--------+-----------+
| user | host |
+--------+-----------+
| ambari | % |
| root | 127.0.0.1 |
| | localhost |
| ambari | localhost |
| root | localhost |
| | sandbox |
| ambari | sandbox |
| root | sandbox |
+--------+-----------+
8 rows in set (0.00 sec)
mysql>quit
Bye
[root@sandbox ~]# mysql -u ambari -p
Enter password:
Welcome to the MySQL monitor. Commands end with ; or \g.
Your MySQL connection id is 10
Server version: 5.1.73 Source distribution
Copyright (c) 2000, 2013, Oracle and/or its affiliates. All rights reserved.
Oracle is a registered trademark of Oracle Corporation and/or its
affiliates. Other names may be trademarks of their respective
owners.
Type 'help;' or '\h' for help. Type '\c' to clear the current input statement.
mysql>show databases;
+--------------------+
| Database |
+--------------------+
| information_schema |
| mysql |
| test |
+--------------------+
3 rows in set (0.00 sec)
mysql>
[7]+ Stopped mysql -u ambari -p
- Next, You need to create ambari database and create all required tables via running a existing .sql file (i.e provided by ambari community):
[root@sandbox ~]# mysql -u ambari -p
Enter password:
Welcome to the MySQL monitor. Commands end with ; or \g.
Your MySQL connection id is 11
Server version: 5.1.73 Source distribution

Copyright (c) 2000, 2013, Oracle and/or its affiliates. All rights reserved.

Oracle is a registered trademark of Oracle Corporation and/or its
affiliates. Other names may be trademarks of their respective
owners.

Type 'help;' or '\h' for help. Type '\c' to clear the current input statement.

mysql>CREATE DATABASE ambari;
Query OK, 1 row affected (0.00 sec)

mysql>use ambari;
Database changed
mysql>show tables;
Empty set (0.00 sec)

mysql>source /var/lib/ambari-server/resources/Ambari-DDL-MySQL-CREATE.sql;
Query OK, 0 rows affected (0.00 sec)

Query OK, 0 rows affected (0.00 sec)

Query OK, 0 rows affected (0.00 sec)


----------------------------------

Query OK, 0 rows affected (0.00 sec)
Records: 0 Duplicates: 0 Warnings: 0

Query OK, 0 rows affected (0.01 sec)
Records: 0 Duplicates: 0 Warnings: 0

Query OK, 0 rows affected (0.00 sec)

You can see all the tables are created:
mysql>show tables;
+-------------------------------+
| Tables_in_ambari |
+-------------------------------+
| ClusterHostMapping |
| QRTZ_BLOB_TRIGGERS |
| QRTZ_CALENDARS |
| QRTZ_CRON_TRIGGERS |
| QRTZ_FIRED_TRIGGERS |
| QRTZ_JOB_DETAILS |
| QRTZ_LOCKS |
| QRTZ_PAUSED_TRIGGER_GRPS |
| QRTZ_SCHEDULER_STATE |
| QRTZ_SIMPLE_TRIGGERS |
| QRTZ_SIMPROP_TRIGGERS |
------------------------------
| viewurl |
| widget |
| widget_layout |
| widget_layout_user_widget |
+-------------------------------+
105 rows in set (0.00 sec)

mysql>quit
Bye
- Next, You need to run ambari setup to setup ambari with mysql:
[root@sandbox ~]# java -version
java version "1.7.0_131"
OpenJDK Runtime Environment (rhel-2.6.9.0.el6_8-x86_64 u131-b00)
OpenJDK 64-Bit Server VM (build 24.131-b00, mixed mode)
[root@sandbox ~]# ambari-server setup
Using python /usr/bin/python
Setup ambari-server
Checking SELinux...
SELinux status is 'disabled'
Customize user account for ambari-server daemon [y/n] (n)?
Adjusting ambari-server permissions and ownership...
Checking firewall status...
Checking JDK...
[1] Oracle JDK 1.8 + Java Cryptography Extension (JCE) Policy Files 8
[2] Oracle JDK 1.7 + Java Cryptography Extension (JCE) Policy Files 7
[3] Custom JDK
==============================================================================
Enter choice (1): 2
To download the Oracle JDK and the Java Cryptography Extension (JCE) Policy Files you must accept the license terms found at http://www.oracle.com/technetwork/java/javase/terms/license/index.html and not accepting will cancel the Ambari Server setup and you must install the JDK and JCE files manually.
Do you accept the Oracle Binary Code License Agreement [y/n] (y)? y
Downloading JDK from http://public-repo-1.hortonworks.com/ARTIFACTS/jdk-7u67-linux-x64.tar.gz to /var/lib/ambari-server/resources/jdk-7u67-linux-x64.tar.gz
jdk-7u67-linux-x64.tar.gz... 100% (135.8 MB of 135.8 MB)
Successfully downloaded JDK distribution to /var/lib/ambari-server/resources/jdk-7u67-linux-x64.tar.gz
Installing JDK to /usr/jdk64/
Successfully installed JDK to /usr/jdk64/
Downloading JCE Policy archive from http://public-repo-1.hortonworks.com/ARTIFACTS/UnlimitedJCEPolicyJDK7.zip to /var/lib/ambari-server/resources/UnlimitedJCEPolicyJDK7.zip

Successfully downloaded JCE Policy archive to /var/lib/ambari-server/resources/UnlimitedJCEPolicyJDK7.zip
Installing JCE policy...
Completing setup...
Configuring database...
Enter advanced database configuration [y/n] (n)? y
Configuring database...
==============================================================================
Choose one of the following options:
[1] - PostgreSQL (Embedded)
[2] - Oracle
[3] - MySQL / MariaDB
[4] - PostgreSQL
[5] - Microsoft SQL Server (Tech Preview)
[6] - SQL Anywhere
[7] - BDB
==============================================================================
Enter choice (1): 3
Hostname (localhost):
Port (3306):
Database name (ambari):
Username (ambari):
Enter Database Password (bigdata):
Re-enter password:
Configuring ambari database...
Configuring remote database connection properties...
WARNING: Before starting Ambari Server, you must run the following DDL against the database to create the schema: /var/lib/ambari-server/resources/Ambari-DDL-MySQL-CREATE.sql
Proceed with configuring remote database connection properties [y/n] (y)? y
Extracting system views...
....ambari-admin-2.5.1.0.159.jar
.......
Adjusting ambari-server permissions and ownership...
Ambari Server 'setup' completed successfully.
- Now you should be happy as you have successfully installed and setup ambari, so next step is to start it but before that you need to run mysql jdbc setup and then start ambari server and agent.
[root@sandbox ~]# ambari-server setup --jdbc-driver=/usr/share/java/mysql-connector-java.jar --jdbc-db=mysql
Using python /usr/bin/python
Setup ambari-server
Copying /usr/share/java/mysql-connector-java.jar to /var/lib/ambari-server/resources
If you are updating existing jdbc driver jar for mysql with mysql-connector-java.jar. Please remove the old driver jar, from all hosts. Restarting services that need the driver, will automatically copy the new jar to the hosts.
JDBC driver was successfully initialized.
Ambari Server 'setup' completed successfully.
[root@sandbox ~]# ambari-server start
Using python /usr/bin/python
Starting ambari-server
Ambari Server running with administrator privileges.
Organizing resource files at /var/lib/ambari-server/resources...
Ambari database consistency check started...
Server PID at: /var/run/ambari-server/ambari-server.pid
Server out at: /var/log/ambari-server/ambari-server.out
Server log at: /var/log/ambari-server/ambari-server.log
Waiting for server start......................................
Server started listening on 8080

DB configs consistency check: no errors and warnings were found.
Ambari Server 'start' completed successfully.
[root@sandbox ~]# ambari-agent start
Verifying Python version compatibility...
Using python /usr/bin/python
Checking for previously running Ambari Agent...
Starting ambari-agent
Verifying ambari-agent process status...
Ambari Agent successfully started
Agent PID at: /var/run/ambari-agent/ambari-agent.pid
Agent out at: /var/log/ambari-agent/ambari-agent.out
Agent log at: /var/log/ambari-agent/ambari-agent.log
If you do not see any error during ambari server start or in ambari-server log file
then it means you have achieved a milestone and now you can goto browser and login
with user: admin , password : admin

Now to install HDP with ambari please follow the instruction from next page “HDP Installation“