Use this procedure to perform a rolling upgrade from HDP 2.2 to HDP 2.3.
It is highly recommended you validate these steps in a test environment to adjust + account for any special configurations for your cluster.

Before upgrading to HDP 2.3, you must first upgrade to Ambari 2.1. Make sure Ambari is upgraded and the cluster are healthy and operating normally prior to attempting to upgrade from HDP 2.2 to HDP 2.3. Once you are running Ambari 2.1, follow these steps to upgrade the Stack from HDP 2.2 to HDP 2.3.
Note: The HDP packages for a complete installation of HDP 2.3 will occupy about 2.5 GB of disk space.
Prerequisites: To perform a rolling upgrade, your cluster must meet the following prerequisites.
- General
- HDFS
- YARN
- MapReduce 2
- Tez
- Hive
- Oozie
General
| Requirement |
Description |
| Current HDP Version |
Must be running HDP 2.2 or later to perform a rolling upgrade. The rolling upgrade capability is not available for clusters running HDP 2.0 or 2.1. |
| Target HDP Version |
All hosts must have the target version installed. See the Register Version and Install Version sections for more information. |
| Ambari Agent Heartbeats |
All Ambari Agents must be heart beating to Ambari Server. Any hosts that are not heartbeating must be in Maintenance Mode. |
| Host Maintenance Mode |
Any hosts in Maintenance Mode must not be hosting any Service master components. |
| Service Maintenance Mode |
No Services can be in Maintenance Mode. |
| Services Started |
All Services must be started and the Service Check must pass. |
HDFS
| Requirement |
Description |
| NameNode HA |
NameNode HA must be enabled and working properly. See the Ambari User’s Guide for more information, Configuring NameNode High Availability. |
| NameNode Truncate |
HDP 2.2.6 introduced the NameNode Truncate option. Truncate must not be enabled. |
| Client Retry |
HDFS client retry should be dfs.client.retry.policy.enabled |
YARN
| Requirement |
Description |
| ResourceManager HA |
YARN ResourceManager HA should be enabled to prevent a disruption in service during the upgrade. See the Ambari User’s Guide for more information on ConfiguringResourceManager High Availability. |
| Start Preserving Recovery |
YARN start preserving recovery should be enabled. Check theServices > YARN > Configs property yarn.timeline-service.recovery.enabled . |
| Work Preserving Restart |
YARN Work Preserving Restart must be configured. Check the Services > YARN > Configs propertyyarn.resourcemanager.work-preserving-recovery.enabled . |
MapReduce 2
| Requirement |
Description |
| MapReduce Distributed Cache |
MapReduce should reference Hadoop libraries from the distributed cache in HDFS. Refer to the YARN Resource Management guide for more information. |
| State Preserving Recovery |
JobHistory state preserving recovery should be enabled. |
| Wire Encryption |
If encrypted shuffle has been enabled, the ssl-client.xml file must be copied to/etc/hadoop/conf/secure on each node in the cluster. |
Tez
| Requirement |
Description |
| Tez Distributed Cache |
Tez should reference Hadoop libraries from the distributed cache in HDFS. |
Hive
| Requirement |
Description |
| Multiple Hive Metastore |
Multiple Hive Metastore instances are recommended for Rolling Upgrade. This ensures that there is at least one Hive Metastore running during the upgrade process. |
| Hive Dynamic Service Discovery |
HiveServer2 dynamic service discovery is recommended for Rolling Upgrade. |
| HiveServer2 Port |
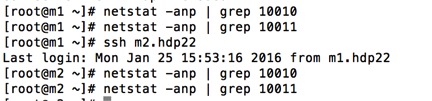
During the upgrade, Ambari will switch the HiveServer2 port from 10000 to 10010 (or 10011 if using HTTP transport mode). |
| Hive Client Retry |
Hive client retry properties must be configured. Review theServices > Hive > Configs configuration and confirmhive.metastore.failure.retries andhive.metastore.client.connect.retry.delay are specified. |
Oozie
| Requirement |
Description |
| Oozie Client Retry |
Oozie client retry properties must be configured. Review theServices > Oozie > Configs > oozie-env configuration and confirm “export OOZIE_CLIENT_OPTS=”${OOZIE_CLIENT_OPTS} -Doozie.connection.retry.count=<number of retries>” is specified. |
Preparing to Upgrade: It is also strongly recommended that you perform backups of your databases before beginning upgrade.
- Ambari database
- Hive Metastore database
- Oozie Server database
- Ranger Admin database
- Ranger Audit database
Checkpoint HDFS
- Perform the following steps on the NameNode host. If you are configured for NameNode HA, perform the following steps on the Active NameNode. You can locate the Active NameNode fromAmbari Web > Services > HDFS in the Summary area.
- Check the NameNode directory to ensure that there is no snapshot of any prior HDFS upgrade. Specifically, using Ambari Web, browse toServices > HDFS > Configs,and examine the namenode.name.dir in the NameNode Directories property. Make sure that only a “/current” directory and no “/previous” directory exists on the NameNode host.
- Create the following log and other files. Creating these logs allows you to check the integrity of the file system after the Stack upgrade. As the HDFS user,” sudo su –hdfs” run the following (where <HDFS_USER> is the HDFS Service user, for example, hdfs):
- Run fsck with the following flags and send the results to a log. The resulting file contains a complete block map of the file system. You use this log later to confirm the upgrade.
hdfs fsck / -files -blocks -locations > dfs-old-fsck-1.log
- Create a list of all the DataNodes in the cluster.
hdfs dfsadmin -report > dfs-old-report-1.log
- Optional: Capture the complete namespace of the file system. The following command does a recursive listing of the root file system:
hadoop dfs -ls -R / > dfs-old-lsr-1.log
- Optional: Copy all unrecoverable data stored in HDFS to a local file system or to a backup instance of HDFS.
- Save the namespace. As the HDFS user, ” sudo su –hdfs” , you must put the cluster in Safe Mode.
hdfs dfsadmin -safemode enter
hdfs dfsadmin -saveNamespace
Note: In a highly-available NameNode configuration, the command hdfs dfsadmin -saveNamespace sets a checkpoint in the first NameNode specified in the configuration, in dfs.ha.namenodes.[nameserviceID]. You can also use the dfsadmin –fs option to specify which NameNode to connect. For example, to force a checkpoint in NameNode2: hdfs dfsadmin -fs hdfs://namenode2-hostname:namenode2-port -saveNamespace
- Copy the checkpoint files located in ${dfs.namenode.name.dir}/currentinto a backup directory.
Note: In a high-available NameNode configuration, the location of the checkpoint depends on where the saveNamespace command is sent, as defined in the preceding step.
- Store the layoutVersion for the NameNode located at ${dfs.namenode.name.dir}/current/VERSION, into a backup directory where ${dfs.namenode.name.dir}is the value of the config parameter NameNode directories. This file will be used later to verify that the layout version is upgraded.
- As the HDFS user, ” sudo su –hdfs”, take the NameNode out of Safe Mode.
hdfs dfsadmin -safemode leave
- Finalize any prior HDFS upgrade, if you have not done so already. As the HDFS user, ” sudo su –hdfs” and run the following: But we need to ignore it as it is recommended in our cluster.
hdfs dfsadmin –finalizeUpgrade
Registering a New Version: Register HDP 2.3.4.0
Log in to Ambari.
Browse to Admin > Stack and Versions.
Click on the Versions You will see the version currently running. The full version is dependent on the HDP version you are actually running. For example, if you are currently running a maintenance release of HDP 2.2, you would see something like HDP-2.2.0.0-2041.
Click Manage Versions.
Proceed to register a new version by clicking + Register Version.
Select the HDP 2.3 Stack and enter a two-digit version number. For example, enter 0(which makes the version name HDP-2.3.0.0).

Select one or more OS families and enter the repository Base URLs. In our case we do not need to provide internet repo as we have setalite serevrs and we have to give their location in base url and HDP-UTILS URL. (Like /tmp/randon.txt)
To copy a Base URL for a specific OS family, see the list of available HDP Repositories.
Click Save.

You can click Install on., or you can browse back to Admin > Stack and Versions. You will see the version currently running HDP-2.2.x.yand the version you just registered HDP-2.3.0.0.
Install HDP 2.3 on All Hosts
Log in to Ambari.
Browse to Admin > Stack and Versions.
Click on the Versions
Click Install Packagesand click OK to confirm. The Install version operation will start and the new version will be installed on all hosts. You can browse to Hosts and to each host > Versions tab to see the new version is installed.

The time it takes to perform the upgrade dependents on many factors. As part of the upgrade process, each component in the cluster is restarted in a serial fashion so the stop/start time is a big contributor to the overall time.
Perform the Upgrade to HDP 2.3: The upgrade process involves a set of stages.
Log in to Ambari.
Browse toAdmin > Stack and Versions.
Click on theVersions
ClickPerform Upgrade.

Ambari will check that your cluster meets theprerequisites. A dialog will be presented with the results:
If any prerequisites are not met but are required, the result will be shown with an error. You will not be allowed to proceed with the upgrade. Make the appropriate corrections and return to Perform Upgrade again.
If any prerequisites are not met but are optional, the result will be shown with a warning. You will be allowed to Proceed with the upgrade.

A list of configuration changes (if any) will be displayed.
Note: If you do not see any error in above window then I would suggest you to skip checks and click on Proceed button.
Once the prerequisite checks are complete, the upgrade will start.

It will ask you to confirm upgrade so simply click on Yes button.
It may ask you to have Hive metastore but if you don’t have then just ignore this step and click on Proceed anyway Button.

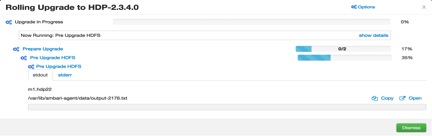
Now you will see upgrade process will start with preparing upgrade for HDFS, HBase services step.


You can see what are the commands it is running by expending setting button.


It will ask you to confirm whether you have taken hive metastore backup or not, if you do not care about hive metastore backup then click on checkbox and then click on Proceed button otherwise click on Pause button and take backup and then proceed again from the same step.

It will ask you to take Oozie backup and now also you can click on checkbox and go to Proceed option.

Now rolling upgrade will start upgrading zookeeper servers. Once it will upgrade then it will go to service check for zookeepr.


Now it will restart all journalNode services on all the servers.

Next it will start updating all configurations for all services.

It will restart all NameNode services on both servers.

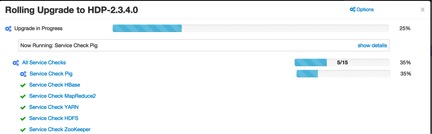
Next it will start service checks for Zookeeper,HDFS,YARN,MapReduce2,HBase,Pig.

Now it will restart DataNode,RegionServer,NodeManager services on all the slave nodes.


Next it will ask you to run some tests against your cluster to ensure proper operation before proceeding to next service upgrade. Now please click on checkbox and proceed to next.

Again it will restart all salve services (DN, RegionServer, NodeManager)

Now it will restart and update Hive metastore.

There is a point to note here is in HDP 2.3 version HiveServer runs on port 10011 and 10010,so it will prompt you to continue with these ports or not. You should check availability of ports and click on Proceed as later you can change ports back to 10000 and 10001.


Next it will update configurations for Hive-site and hiveserver2.

It will update webhcat service ad then restart it.

Next it will update config for Oozie and will restart oozie service. Also will run service check for it.

It will restart falcon and Zookeeper clients also will restart HDFS clients on all the dedicated nodes.


Again it will run service checks for all services.

It will start updating kafka and will restart it.

Next it will update knox configuration and will restart it.

Now to upgrade storm it will ask you to kill all storm topology and then you have to click on checkbox and proceed to next.

Now it will update all storm configurations and will restart it.

It will again prompt you to build new storm topology and to proceed but you can simply click on checkbox and go to Proceed.
Next it will start updating Flume config and will restart it.

Finally it will start updating reaming HDP configurations.

So now you have successfully upgrade HDP stack and it is your final step of the upgrade. So here you will get two options (Finalize later or Finalize). Finalize later means you can run your service check and whenever you are fine with upgrade then you can finalize it.

If you want to finalize it now only then click on finalize button.

So it will finally upgrade your HDP stack 2.2 to 2.3.


I hope it will help you to upgrade your cluster smoothly.
Please feel free to write your comments or suggestion.