The following gives a high level description of the kerberos installation process.
Before you install kerberos please ensure all hosts in the realm must be time-synchronized, for example, by using the Network Time Protocol (NTP). If the local system time of a client differs from that of the KDC by as little as 5 minutes (the default), the client will not be able to authenticate because kerberos is a time-sensitive protocol.
1. Install the KDC Server on anyone of your server:
[root@m1 ~]# yum install krb5-server krb5-libs krb5-workstation
Loaded plugins: fastestmirror
Setting up Install Process
Loading mirror speeds from cached hostfile
* base: repos.dfw.quadranet.com
* extras: mirror.steadfast.net
* updates: mirror.steadfast.net
HDP-2.5 | 2.9 kB 00:00
HDP-2.5.3.0 | 2.9 kB 00:00
HDP-UTILS-1.1.0.21 | 2.9 kB 00:00
HDP-UTILS-2.5.3.0 | 2.9 kB 00:00
Updates-ambari-2.4.1.0 | 2.9 kB 00:00
base | 3.7 kB 00:00
extras | 3.4 kB 00:00
updates | 3.4 kB 00:00
Resolving Dependencies
There are unfinished transactions remaining. You might consider running yum-complete-transaction first to finish them.
The program yum-complete-transaction is found in the yum-utils package.
–> Running transaction check
—> Package krb5-libs.x86_64 0:1.10.3-33.el6 will be updated
—> Package krb5-libs.x86_64 0:1.10.3-57.el6 will be an update
—> Package krb5-server.x86_64 0:1.10.3-57.el6 will be installed
HDP-2.5/filelists_db | 337 kB 00:00
HDP-2.5.3.0/filelists_db | 337 kB 00:00
HDP-UTILS-1.1.0.21/filelists_db | 94 kB 00:00
HDP-UTILS-2.5.3.0/filelists_db | 94 kB 00:00
Updates-ambari-2.4.1.0/filelists_db | 139 kB 00:04
base/filelists_db | 6.4 MB 02:46
extras/filelists_db | 38 kB 00:02
updates/filelists_db | 3.0 MB 00:30
–> Processing Dependency: /usr/share/dict/words for package: krb5-server-1.10.3-57.el6.x86_64
—> Package krb5-workstation.x86_64 0:1.10.3-57.el6 will be installed
–> Running transaction check
—> Package words.noarch 0:3.0-17.el6 will be installed
–> Finished Dependency Resolution
Dependencies Resolved
====================================================================================================================================================================
Package Arch Version Repository Size
====================================================================================================================================================================
Installing:
krb5-server x86_64 1.10.3-57.el6 base 2.0 M
krb5-workstation x86_64 1.10.3-57.el6 base 813 k
Updating:
krb5-libs x86_64 1.10.3-57.el6 base 770 k
Installing for dependencies:
words noarch 3.0-17.el6 base 1.4 M
Transaction Summary
====================================================================================================================================================================
Install 3 Package(s)
Upgrade 1 Package(s)
Total download size: 4.9 M
Is this ok [y/N]: Y
Downloading Packages:
(1/4): krb5-libs-1.10.3-57.el6.x86_64.rpm | 770 kB 00:25
(2/4): krb5-server-1.10.3-57.el6.x86_64.rpm | 2.0 MB 01:00
(3/4): krb5-workstation-1.10.3-57.el6.x86_64.rpm | 813 kB 00:17
(4/4): words-3.0-17.el6.noarch.rpm | 1.4 MB 00:39
——————————————————————————————————————————————————————–
Total 34 kB/s | 4.9 MB 02:25
Running rpm_check_debug
Running Transaction Test
Transaction Test Succeeded
Running Transaction
Updating : krb5-libs-1.10.3-57.el6.x86_64 1/5
Installing : words-3.0-17.el6.noarch 2/5
Installing : krb5-server-1.10.3-57.el6.x86_64 3/5
Installing : krb5-workstation-1.10.3-57.el6.x86_64 4/5
Cleanup : krb5-libs-1.10.3-33.el6.x86_64 5/5
Verifying : words-3.0-17.el6.noarch 1/5
Verifying : krb5-libs-1.10.3-57.el6.x86_64 2/5
Verifying : krb5-server-1.10.3-57.el6.x86_64 3/5
Verifying : krb5-workstation-1.10.3-57.el6.x86_64 4/5
Verifying : krb5-libs-1.10.3-33.el6.x86_64 5/5
Installed:
krb5-server.x86_64 0:1.10.3-57.el6 krb5-workstation.x86_64 0:1.10.3-57.el6
Dependency Installed:
words.noarch 0:3.0-17.el6
Updated:
krb5-libs.x86_64 0:1.10.3-57.el6
Complete!
2.Using a text editor, open the KDC server configuration file, located by default here:
Change the [realms] section of this file by replacing the default “kerberos.example.com” setting for the kdc and admin_server properties with the Fully Qualified Domain Name of the KDC server host. In the following example, “kerberos.example.com” has been replaced with “my.kdc.server”.
[root@m1 ~]# ls -ltrh /etc/krb5.conf
-rw-r–r– 1 root root 449 Mar 8 2016 /etc/krb5.conf
[root@m1 ~]# vi /etc/krb5.conf
root@m1 ~]# cat /etc/krb5.conf
[libdefaults]
renew_lifetime = 7d
forwardable = true
default_realm = HADOOPADMIN.COM
ticket_lifetime = 24h
dns_lookup_realm = false
dns_lookup_kdc = false
default_ccache_name = /tmp/krb5cc_%{uid}
#default_tgs_enctypes = aes des3-cbc-sha1 rc4 des-cbc-md5
#default_tkt_enctypes = aes des3-cbc-sha1 rc4 des-cbc-md5
[domain_realm]
m1.hdp22 = HADOOPADMIN.COM
[logging]
default = FILE:/var/log/krb5kdc.log
admin_server = FILE:/var/log/kadmind.log
kdc = FILE:/var/log/krb5kdc.log
[realms]
HADOOPADMIN.COM = {
admin_server = m1.hdp22
kdc = m1.hdp22
}
3. Create the Kerberos Database : Use the utility kdb5_util to create the Kerberos database. Please remember password whatever you set during this step.
[root@m1 ~]# kdb5_util create -s
Loading random data
Initializing database ‘/var/kerberos/krb5kdc/principal’ for realm ‘HADOOPADMIN.COM’,
master key name ‘K/M@HADOOPADMIN.COM’
You will be prompted for the database Master Password.
It is important that you NOT FORGET this password.
Enter KDC database master key:
Re-enter KDC database master key to verify:
4. Start the KDC : Start the KDC server and the KDC admin server.
[root@m1 ~]# service krb5kdc start
Starting Kerberos 5 KDC: [ OK ]
[root@m1 ~]# service kadmin start
Starting Kerberos 5 Admin Server: [ OK ]
5. When installing and managing your own MIT KDC, it is very important to set up the KDC server to auto-start on boot. For example:
[root@m1 ~]# chkconfig krb5kdc on
[root@m1 ~]# chkconfig kadmin on
6. Create a Kerberos Admin : Kerberos principals can be created either on the KDC machine itself or through the network, using an “admin” principal. The following instructions assume you are using the KDC machine and using the kadmin.local command line administration utility. Using kadmin.local on the KDC machine allows you to create principals without needing to create a separate “admin” principal before you start.
[root@m1 ~]# kadmin.local -q “addprinc admin/admin”
Authenticating as principal root/admin@HADOOPADMIN.COM with password.
WARNING: no policy specified for admin/admin@HADOOPADMIN.COM; defaulting to no policy
Enter password for principal “admin/admin@HADOOPADMIN.COM”:
Re-enter password for principal “admin/admin@HADOOPADMIN.COM”:
Principal “admin/admin@HADOOPADMIN.COM” created.
7. Ensure that the KDC ACL file includes an entry so to allow the admin principal to administer the KDC for your specific realm. When using a realm that is different than EXAMPLE.COM, be sure there is an entry for the realm you are using. If not present, principal creation will fail. For example, for an admin/admin@HADOOP.COM principal, you should have an entry:
[root@m1 ~]# cat /var/kerberos/krb5kdc/kadm5.acl
*/admin@HADOOPADMIN.COM *
8. After editing and saving the kadm5.acl file, you must restart the kadmin process :
[root@m1 ~]# service kadmin restart
Stopping Kerberos 5 Admin Server: [ OK ]
Starting Kerberos 5 Admin Server: [ OK ]
9.Enabling Kerberos Security : Whether you choose automated or manual Kerberos setup, Ambari provides a wizard to help with enabling Kerberos in the cluster. This section provides information on preparing Ambari before running the wizard, and the steps to run the wizard.
Note :Prerequisites for enabling Kererbos are having the JCE installed on all hosts on the cluster (including the Ambari Server) and having the Ambari Server host as part of the cluster. This means the Ambari Server host should be running an Ambari Agent.
9.1 Installing the JCE : Before enabling Kerberos in the cluster, you must deploy the Java Cryptography Extension (JCE) security policy files on the Ambari Server and on all hosts in the cluster.
[root@m1 ~]# java -version
java version “1.7.0_75”
OpenJDK Runtime Environment (rhel-2.5.4.0.el6_6-x86_64 u75-b13)
OpenJDK 64-Bit Server VM (build 24.75-b04, mixed mode)
On the Ambari Server, obtain the JCE policy file appropriate for the JDK version in your cluster.
For Oracle JDK 1.8:
http://www.oracle.com/technetwork/java/javase/downloads/jce8-download-2133166.html
For Oracle JDK 1.7:
http://www.oracle.com/technetwork/java/javase/downloads/jce-7-download-432124.html
Save the policy file archive in a temporary location.
On Ambari Server and on each host in the cluster, add the unlimited security policy JCE jars to $JAVA_HOME/jre/lib/security/.
For example, run the following to extract the policy jars into the JDK installed on your host:
[root@m1 ~]# unzip -o -j -q UnlimitedJCEPolicyJDK7.zip -d /usr/jdk64/jdk1.7.0_67/jre/lib/security/
[root@m1 ~]# ls -ltrh /usr/jdk64/jdk1.7.0_67/jre/lib/security/
total 144K
-rw-rw-r– 1 root root 2.5K May 31 2011 US_export_policy.jar
-rw-r–r– 1 root root 7.2K May 31 2011 README.txt
-rw-rw-r– 1 root root 2.5K May 31 2011 local_policy.jar
-rw-r–r– 1 root hadoop 158 Jul 25 2014 javafx.policy
-rw-r–r– 1 root hadoop 0 Jul 25 2014 trusted.libraries
-rw-r–r– 1 root hadoop 18K Jul 25 2014 java.security
-rw-r–r– 1 root hadoop 2.6K Jul 25 2014 java.policy
-rw-r–r– 1 root hadoop 91K Jul 25 2014 cacerts
-rw-r–r– 1 root hadoop 3.8K Jul 25 2014 blacklist
-rw-r–r– 1 root hadoop 98 Jul 25 2014 javaws.policy
Restart Ambari Server.
[root@m1 ~]# ambari-server restart
Using python /usr/bin/python
Restarting ambari-server
Using python /usr/bin/python
Stopping ambari-server
Ambari Server stopped
Using python /usr/bin/python
Starting ambari-server
Ambari Server running with administrator privileges.
Organizing resource files at /var/lib/ambari-server/resources…
Ambari database consistency check started…
No errors were found.
Ambari database consistency check finished
Server PID at: /var/run/ambari-server/ambari-server.pid
Server out at: /var/log/ambari-server/ambari-server.out
Server log at: /var/log/ambari-server/ambari-server.log
Waiting for server start………………..
Ambari Server ‘start’ completed successfully.
Distribute JCE package to all the servers in your cluster :
[root@m1 ~]# scp UnlimitedJCEPolicyJDK7.zip root@m2.hdp:
ssh: Could not resolve hostname m2.hdp: Name or service not known
lost connection
[root@m1 ~]# scp UnlimitedJCEPolicyJDK7.zip root@m2.hdp22:
UnlimitedJCEPolicyJDK7.zip 100% 7426 7.3KB/s 00:00
[root@m1 ~]# scp UnlimitedJCEPolicyJDK7.zip root@w1.hdp22:
UnlimitedJCEPolicyJDK7.zip 100% 7426 7.3KB/s 00:00
[root@m1 ~]# scp UnlimitedJCEPolicyJDK7.zip root@w2.hdp22:
UnlimitedJCEPolicyJDK7.zip 100% 7426 7.3KB/s 00:00
[root@m1 ~]# scp UnlimitedJCEPolicyJDK7.zip root@w3.hdp22:
UnlimitedJCEPolicyJDK7.zip
Launching the Kerberos Wizard (Automated Setup) Be sure you have Installed and Configured your KDC and have prepared the JCE on each host in the cluster.
- Log in to Ambari Web and Browse to Admin > Kerberos and Click “Enable Kerberos” to launch the wizard


- Select the type of KDC you are using and confirm you have met the prerequisites

- Provide information about the KDC and admin account,test connection and then Proceed with the install.


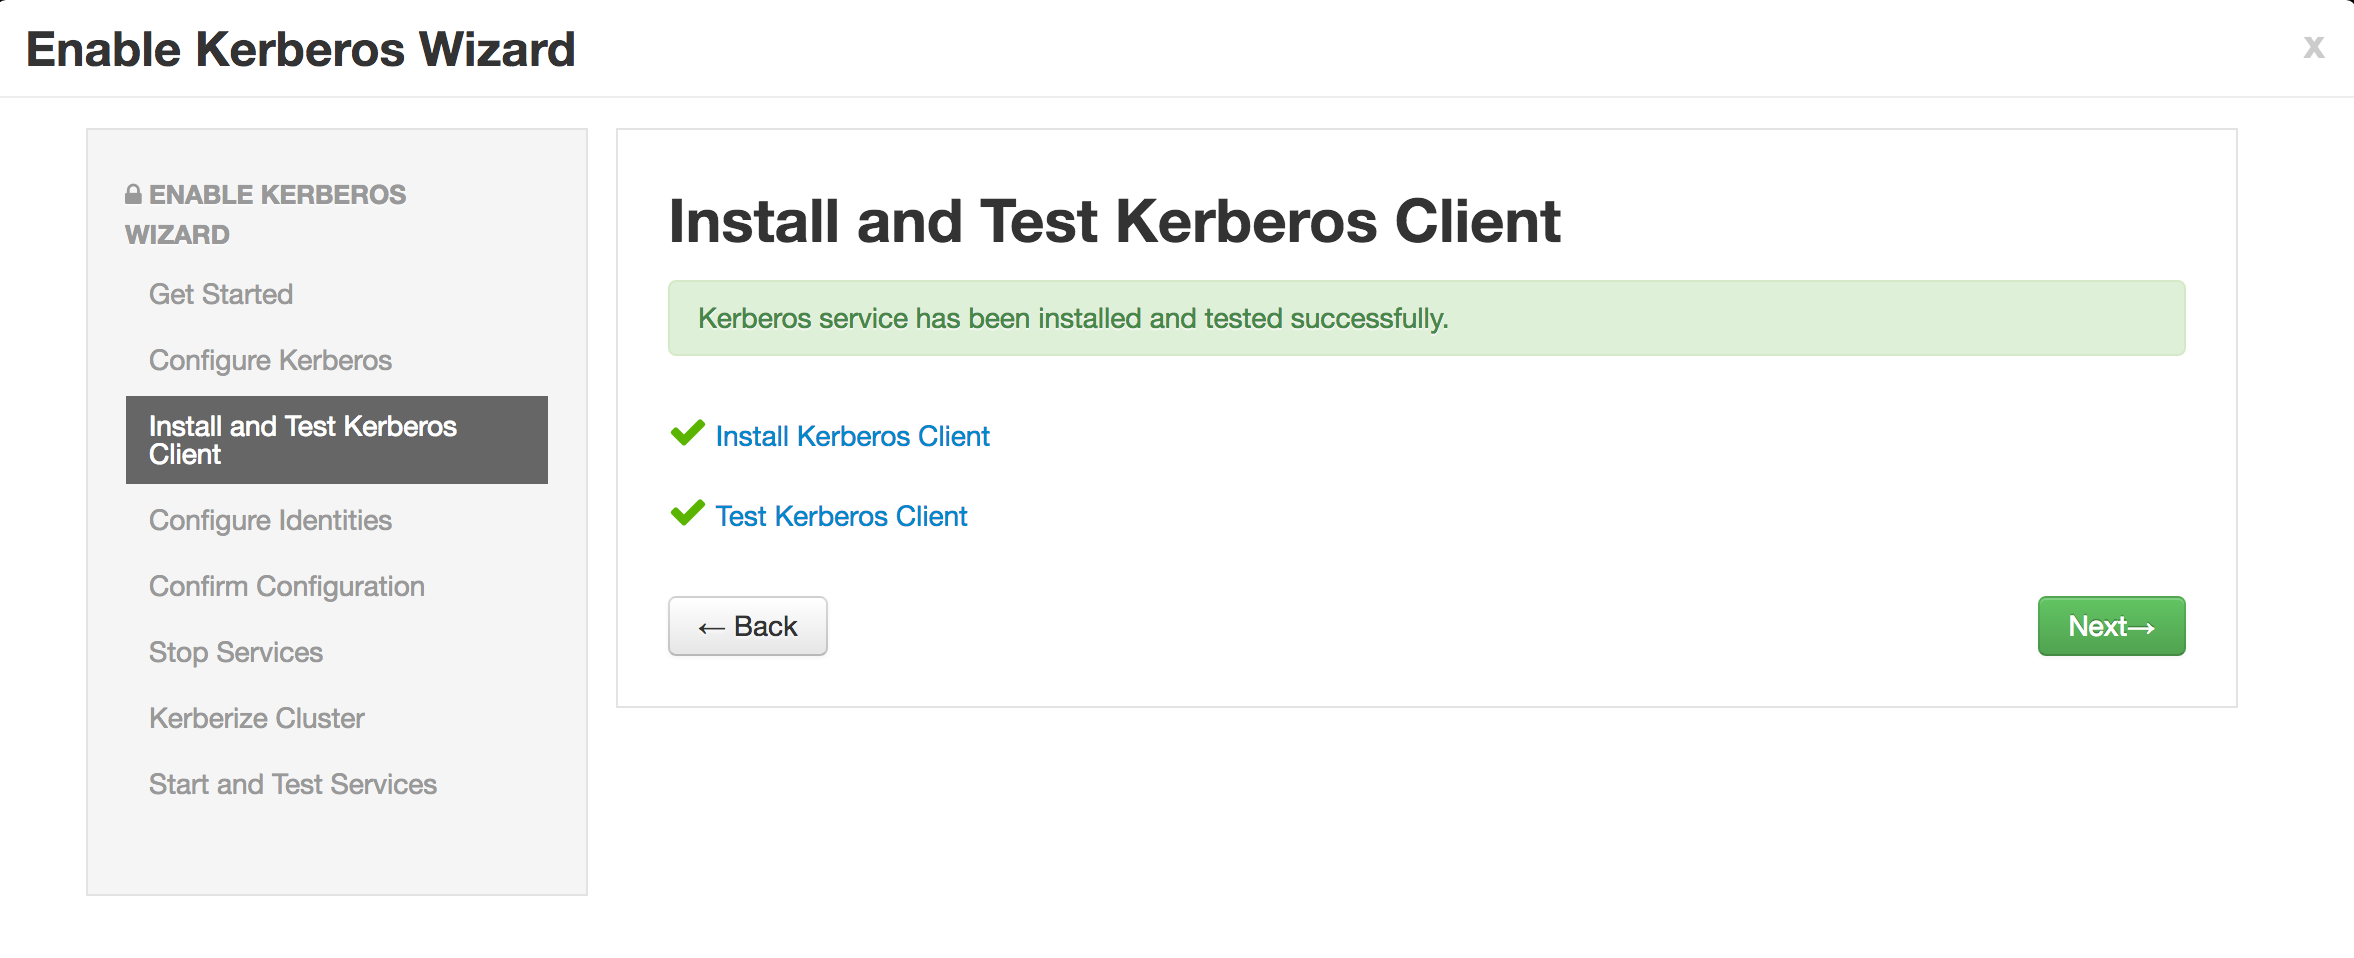
- Ambari will install Kerberos clients on the hosts and test access to the KDC by testing that Ambari can create a principal, generate a keytab and distribute that keytab
- Customize the Kerberos identities used by Hadoop and proceed to kerberize the cluster


Important Note: On the Configure Identities step, be sure to review the principal names, particularly the Ambari Principals on the General tab. These principal names, by default, append the name of the cluster to each of the Ambari principals. You can leave this as default or adjust these by removing the “-${cluster-name}” from principal name string. For example, if your cluster is named HDP and your realm is EXAMPLE.COM, the hdfs principal will be created as hdfs-HDP@EXAMPLE.COM.
- Confirm your configuration. You can optionally download a CSV file of the principals and keytabs that Ambari will automatically create. Click Next to start the process


- After principals have been created and keytabs have been generated and distributed, Ambari updates the cluster configurations, then starts and tests the Services in the cluster


- Click on complete when all required actions done

Verify whether kerberos is enabled properly or not.

Note :If your cluster includes Storm, after enabling Kerberos, you must also Set Up Ambari for Kerberos for Storm Service Summary information to be displayed in Ambari Web. Otherwise, you will see n/a for Storm information such as Slots, Tasks, Executors and Topologies.
I hope this article helped you to configure kerberos quickly,please feel free to give your valuable feedback or suggestions.
1 Comment
Kirti
February 28, 2017 at 10:42 amVery well explained!!